Bus Countdown
This holds two sub projects: PHP countdown and the imp count down. This was an idea that came from the neighborhood forum. There are people in the Ham and Petersham area that do not mobile phone let alone smart phone. TFL where contacted to add more countdowns but tfl have already set all the countdowns they wanted. TFL would not allow for us to install countdowns on their bus stops so the idea is to have a device in local houses, shops, libraries , etc that will indicate the countdown for bus stops near by. That way people will not have to wait in the rain for example.
Current status: WORKING London Hackspace are in the an API expiration situation
-
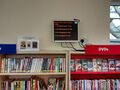
Installed in the Ham Library
-
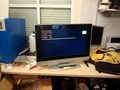
Testing it at RML


Version 3.0
Building the third version, we are focused on maintainability, resiliency, and removing as many moving parts as possible.
Proposed infrastructure upgrades:
Install autossh to provide persistent reverse SSH tunnel (via our VPS Server_RML - diagnose system, restart, etc.
If we don't have sufficient control over the library network, we can create a secure shell tunnel via our RML VPS.
All ports are closed by default. So this will need a more clever system.
Avoid clever 11 year olds with wifi access
Just set up a MOTD with:
$ sudo nano /etc/motd
YOOOOOOOO
Well done! you are into our system!
Please remember great power comes great responsibility.
In other words: we kindly ask you please do not mess up this little kiosk computer.
It would be great if you contact us in #rml or just pop by
RICHMOND MAKERLABS!
Cronjob DPMS screen wake-and-sleep commands during Ham Library opening times
Using a physical timer is a cumbersome workaround when the Raspberry Pi is already low-power and can send commands using the Display Power Management System (DPMS) protocol to power down the screen which consumes the great majority of the power. We may also want to do some administration of the system (special bugfix, OS patch, etc.) outside of business hours.
So the best command found for raspberry pi is
$ vcgencmd display_power 0 #turn off
$ vcgencmd display_power 1 #turn on
This sets the screen to sleep mode. And then turns it on again. Without sudo so can be set in a normal crontab.
$ crontab -e
15 18 * * 1,2,5 vcgencmd display_power 0
15 16 * * 6 vcgencmd display_power 0
15 19 * * 3 vcgencmd display_power 0
30 8 * * 1,2,5,6 vcgencmd display_power 1
15 9 * * 3 vcgencmd display_power 1
Cronjob automated git pull (code repository update) of JS-countdown code
If the reverse SSH tunnel fails (or never worked due to restrictive firewall rules), the code can still be updated because every night (or even every 12 hours) the system will update the code against the repository and restart the browser accordingly. Requires a simple shell script to wrap everything together.
Swap RaspberryPi 1/2 for RaspberryPi Zero with wifi
Also possibly tap in 5 volt input from LCD display (as we currently do) and power directly into GPIO header and then possibly build into screen RPi Zero takes very little power, will use the only USB jack for the wifi adapter, and requires no input devices, sound devices, or anything else. It is small enough that it may be able to be stuck inside the monitor chassis or simply double-stick-taped onto the back of the monitor.
Clean up messy wiring behind screen - fit and finish work
Clean up the messy wiring to give it a proud, semi-professional look. Consider adding a little sticker "Bus Countdown Software & Hardware designed and built by the Richmond MakerLab http://richmondmakerlabs.uk" With the integration of Iain's JS version, it should work very well and be relatively pain free. We have have cable tidy in the space that we can use to stick to the back of the screen.
Software update
Visit the Gitlab repository Iain's JS version. This version is not currently live in library because it math.trunc() and math.round() do not work on WebKit browsers in the Raspberry Pi. Also OS-wise, is unattended-upgrades running?
Iain commented on the mailing list with the following solution with Firefox:
 These are the steps I took to successfully run Firefox full-screen on a raspberry pi using a Kiosk add-on:

 Step 0: Create “kiosk" user profile
 This allows you to turn kiosk mode on/off at the command line by applying different user profiles.
 At command line firefox -P This opens the user profile manager.
 Create new profile. I named mine “kiosk’
 DO NOT hit the “Start Firefox” button
 Select the “default” profile from the list (or any other profile you want as the primary, just not “kiosk”)
 Check the “Use selected profile without asking at startup”. This will ensure that profile will be used when starting firefox normally.
 Hit “Exit” to close profile manager
 Step 1: Install browser add-on
 At command line firefox -P “kiosk” to start firefox with “kiosk” user profile.
 From menu go to Add-ons manager
 Search for "r-kiosk”. There may be several matching results but I used “kiosk-costaisa” for no particular reason. Others may work just as well.
 Install
 Shut down browser
 Step 2: Run full-screen
 At command line firefox -P “kiosk” <url to web page> to launch full-screen.

 Exiting full screen.
 The only way to exit full-screen is to quit firefox altogether. Normally ctrl/F4 will do this, but on one occasion I had to resort to killing from the command line with ssh.

 Disable/uninstall kiosk add-on.
 DO NOT be tempted to access Add-ons manager when in kiosk mode - I think this is how I managed to disable ctrl/F4. Instead firefox -P “kiosk” safe-mode will temporarily disable all add-ons. You can run Add-ons manager in safe mode and then restart.
See it working here on our littlehouse server.
Version 2.0
a) register to the API done by Amunizp (talk) using the 81.2.114.76 address terms and conditions are:
You must, where You do any of the above:
  * acknowledge TfL as the source of this Information by including the following attribution statement ‘Powered by TfL Open Data’;
  * acknowledge that this Information contains Ordnance Survey derived data by including the following attribution statement ‘Contains OS data © Crown copyright and database rights 2016’
  * ensure our intellectual property rights, including all logos, design rights, patents and trademarks, are protected by following our design and branding guidelines ;
  * limit traffic requests up to a maximum of 300 calls per minute per data feed. Tfl reserves the right to throttle or limit access to feeds when it is believed the overall service is being degraded by excessive use; and
  * ensure the information You provide on registration is accurate.
These are important conditions of this Licence and if You fail to comply with them, the rights granted to You under this licence, or any similar licence granted by TfL, will end automatically.
b) Find out what our bus stop is: Check out these two very helpful references: link arrival of things and location of things. Do note that bus stations have a more complex structure and have several naptanIdReference.
On the command line you type:
$ curl -s "https://api.tfl.gov.uk/StopPoint/Search?query="Eden Street"&mode=bus"
Or on your web browser you put in the following address: [1]
This will find the matching Bus stops with "Eden street" in the name.
Once you find the stop you want to take note of the id and put it similarly into a website as so: [2]
There you want to record the naptanIdReference which will identify your stop.
| Stop_Code_LBSL | Bus_Stop_Code | Naptan_Atco | Stop_Name | Location_Easting | Location_Northing | Heading | Stop_Area | Virtual_Bus_Stop |
|---|---|---|---|---|---|---|---|---|
| 33729 | 56822 | 490003412E | ASHBURNHAM ROAD | 517258 | 172315 | 239 | MA03 | 0 |
| R0897 | 51750 | 490003412W | ASHBURNHAM ROAD | 517265 | 172329 | 59 | MA03 | 0 |
c) We will use the Live bus and river bus arrivals API (instant) This API provides real-time bus and river bus arrival information across all TfL bus stops and piers. Instant requests are responded to with the live bus and river bus arrival information valid at that point in time.
d) Using my api ID and key I can go to he API generating website: https://api.tfl.gov.uk/ and select /Line/{ids}/Arrivals?stopPointId={stopPointId} to Get the list of arrival predictions for given line ids based at the given stop: Our Line is: 371 and our bus stops are 490003412E and 490003412W which will generate a web page with the following information (can't put the link because it contains API key and ID
[{"$type":"Tfl.Api.Presentation.Entities.Prediction, Tfl.Api.Presentation.Entities","id":"1426557777","operationType":1,"vehicleId":"SN09CHH","naptanId":"490003412E","stationName":"Ashburnham Road","lineId":"371","lineName":"371","platformName":"null","direction":"inbound","bearing":"239","destinationNaptanId":"","destinationName":"Kingston","timestamp":"2016-09-19T10:07:49Z","timeToStation":1403,"currentLocation":"","towards":"Kingston","expectedArrival":"2016-09-19T10:31:12.4956283Z","timeToLive":"2016-09-19T10:31:42.4956283Z","modeName":"bus"},{"$type":"Tfl.Api.Presentation.Entities.Prediction, Tfl.Api.Presentation.Entities","id":"-1913386071","operationType":1,"vehicleId":"YT59PBV","naptanId":"490003412E","stationName":"Ashburnham Road","lineId":"371","lineName":"371","platformName":"null","direction":"inbound","bearing":"239","destinationNaptanId":"","destinationName":"Kingston","timestamp":"2016-09-19T10:07:49Z","timeToStation":147,"currentLocation":"","towards":"Kingston","expectedArrival":"2016-09-19T10:10:16.4956283Z","timeToLive":"2016-09-19T10:10:46.4956283Z","modeName":"bus"},{"$type":"Tfl.Api.Presentation.Entities.Prediction, Tfl.Api.Presentation.Entities","id":"-210045726","operationType":1,"vehicleId":"YX60CBU","naptanId":"490003412E","stationName":"Ashburnham Road","lineId":"371","lineName":"371","platformName":"null","direction":"inbound","bearing":"239","destinationNaptanId":"","destinationName":"Kingston","timestamp":"2016-09-19T10:07:49Z","timeToStation":915,"currentLocation":"","towards":"Kingston","expectedArrival":"2016-09-19T10:23:04.4956283Z","timeToLive":"2016-09-19T10:23:34.4956283Z","modeName":"bus"},{"$type":"Tfl.Api.Presentation.Entities.Prediction, Tfl.Api.Presentation.Entities","id":"248674719","operationType":1,"vehicleId":"YX60CBV","naptanId":"490003412E","stationName":"Ashburnham Road","lineId":"371","lineName":"371","platformName":"null","direction":"inbound","bearing":"239","destinationNaptanId":"","destinationName":"Kingston","timestamp":"2016-09-19T10:07:49Z","timeToStation":373,"currentLocation":"","towards":"Kingston","expectedArrival":"2016-09-19T10:14:02.4956283Z","timeToLive":"2016-09-19T10:14:32.4956283Z","modeName":"bus"}]
e) Now the PHP code:
  $stopnumber = "490003412W";
  //west
  display ($apikey, $nameID, $name,$stopnumber);
  $stopnumber = "490003412E";
  //east
  display ($apikey, $nameID, $name,$stopnumber);
  function display ($apikey, $nameID, $name,$stopnumber)
  {
  $url = "https://api.tfl.gov.uk/Line/371/Arrivals?stopPointId=$stopnumber&app_id=$nameID&app_key=$apikey";
  $result= file_get_contents($url);
  $info =  (json_decode($result,true));
  $line = 0;
  foreach ($info[$line] as $bus ) {
  printf($line);
  printf($info[$line]["lineId"]);
  printf($info[$line]["towards"]);
  printf($info[$line]["timeToStation"]);
  echo("<paragraph></paragraph>");
  ++$line;
  if ( $line == 3 ) {
  break;
  }
We need to add the part that sorts the $info file by order of bus arrival.
f) Now the result should be Bus number - Direction - time for next bus which is what we get see http://81.2.114.76/kml-tfl-countdown/countdown.php
g) We set up so that staff library don't turn off the bus countdown manually currupting the drive we do
$ sudo crontab -e
15 18 * * 1,2,5 /sbin/shutdown -h now
15 16 * * 6 /sbin/shutdown -h now
15 19 * * 3 /sbin/shutdown -h now
Turns off Monday, Tuesday and Friday at 6:15 pm Turns off Saturday at 4.15 pm Turns off Wednesday at 7:15 pm Thursdays the ham library is off.
TODO: check that it really turns off at those times. Raspberry pi seems to work at a different time. (1 hr less?)
h) For some reason the web is blocked IT support (learning network) after some time. So we where suggested to fix the IP. We need to find out what IP address or PI is on.
$ ifconfig #Gives us the IP
$ nmap 10.215.100.0/24 #checks the ports that are open.
We only need to fix the wireless so add the following to the end of the file:
$ sudo nano /etc/dhcpcd.conf
# add static IP address only wireless
interface wlan0
static ip_address=10.215.100.6/24
static routers=10.215.100.1
static domain_name_servers=10.215.100.1
TODO: find out if it is still blocking it.
i) finally the autostart needs to be changed so it looks up novo:
$ sudo nano /etc/xdg/lxsession/LXDE-pi/autostart
@lxpanel --profile LXDE-pi
@pcmanfm --desktop --profile LXDE-pi
@xscreensaver -no-splash
#@chromium --noerrdialogs --kiosk  http://81.2.114.76/kml-tfl-countdown/countdo$
@midori -e Fullscreen -a http://81.2.114.76/kml-tfl-countdown/countdown.php
@unclutter
@xset s noblank
@xset s off
@xset -dpms
TODO: This might be best to be set in the LXDE user profile of the pi so that we don't need sudo access but We can leave that for another day.
PHP
This was the original project it is PHP code that sits on the web page and posts the nearby countdown. [3]
Electric Imp count down
This is the next evolution of the countdown. It uses the Electric Imp [4] and squirrel code sorted in a cloud [5]. The bus arrival times are displayed on a 4 line 20 character LCD display, showing the current time, temperature and up to three lines of bus arrival times. The imp connects to a wireless network and accesses live TFL data which is in JSON format.
--M0TZO (talk) Suggests also looking
into ones with LED indicators for example if only one or two bus routes
needed & audio version for the sight impaired.
Ham Library Project
Take a RaspberryPi computer with Raspbian installed. Instructions are easy to follow with NOOBS.
  $ sudo apt-get install php5
  $ sudo apt-get install apache2
Further info about the above can be found here we then download the php project above (normally a zip file) extract it to a place you will work. copy that folder to "web page folder"
$ sudo cp -l -R LibraryProject/kml-tfl-countdown-master/ /var/www/html/
or
$ sudo cp -l kml-tfl-countdown-master/countdown.php /var/www/html/
sudo is needed because only administrators have access to the /var/wwww folder The -l means that we can create a link this means that we can modify the file where it is without having to go into the /var/www which requires sudo admin to go in. This might be "risky" to do in a real web page because then someone can sit at your computer and type in malicious code. I think. the -R is so that we can copy the folder (directory) that contains the php code.
We can now visit our "web page" http://localhost/kml-tfl-countdown-master/countdown.php or http://localhost/html/kml-tfl-countdown-master/countdown.php or http://localhost/countdown.php
Now we would like to have it start up as a web page at boot up in full screen.
After some lessons learnt we found that the best way to do this was using the LXDE startup:
$ sudo nano /etc/xdg/lxsession/LXDE-pi/autostart
This LXDE startup might be turned off for some distros but does seem to work with raspbian. (note that it is LXDE-pi for raspberry pi and plain LXDE for other computers, why? don't know but they both seem to work for the pi) This will show a series of things that start after the window manager has loaded.
all we have to do is write
@epiphany-browser http://localhost/kml-tfl-countdown-master/countdown.php
at the end of the document and now every time we boot up the Raspberry Pi we wait a minute and sure enough our web page opens in epiphany. Almost as if we where in control of our computer (sadly we are not).
But we are still not in full screen mode. As seen bellow epiphany does not yet support command line arguments (but we can work on that on a later date)
But luckily there are other light weight browsers like midori. But we need to install it first:
$ sudo apt-get install midori
and after we install it we can test the following:
$ midori -e Fullscreen -a http://localhost/kml-tfl-countdown-master/countdown.php
Awesome the -e tells it to go Full screen the -a will go to the website that we tell them. All done!
The final thing we did was remove the bus stops from mariner gardens. it is as easy as commenting out the following lines or our php code:
//$name = "Mariner Gardens to Richmond";
//$stopnumber = 57780;
//display ($name,$stopnumber);
//$name = "Mariner Gardens to Kingston";
//$stopnumber = 57522;
//display ($name,$stopnumber);
This leaves us plenty of space for other features. But that would be version 1 complete!
How to get the mouse pointer out of the way? We install unclutter sudo apt-get install unclutter and run it just as above
$ sudo apt-get install unclutter
and edit the startup file as above to add this at the end.
@unclutter
BOOOM. Plug in the power to your Raspberry Pi and you have our countdown set up in 50 seconds.
After some time the screen goes blank (power saving mode) this can be turned off.
add the following to the autostart script
@xset s off -dpms
Now all we need is for someone to donate a microusb phone charger that will work with the pi.
we will also need a screen that accepts HDMI.
Conclusions (tl;dr)
Dependancies: apache2, php5, midori, unclutter Add the following php code to your local web page: Pastebin link

<!DOCTYPE html> <html lang="en"> <head> <meta charset="utf-8" /> <title>Buses from Kingston MakerLabs</title> <meta http-equiv="refresh" content="16"> <meta name="viewport" content="width=device-width"> <meta name="apple-mobile-web-app-capable" content="yes" /> <style type="text/css" media="screen"> body { background-color:#000; color:#FFA500; font-family: Tahoma, Geneva, sans-serif; font-size:1.2em; } </style> <body> <!-- insert comment here --> <!-- there is some php code here that can be found in https://github.com/KingstonMakerLabs/kml-tfl-countdown please contribuite! This software is released under AGPL 3 or later see https://www.gnu.org/licenses/agpl-3.0.html for more details. --> <header> <h4>Buses from Ham Library</h4><img src="huglogo.png" style="float:right;"> </header> <?php $name = "Ashburnham Road to Richmond"; $stopnumber = 51750; display ($name,$stopnumber); $name = "Ashburnham Road to Kingston"; $stopnumber = 56822; display ($name,$stopnumber); //$name = "Mariner Gardens to Richmond"; //$stopnumber = 57780; //display ($name,$stopnumber); //$name = "Mariner Gardens to Kingston"; //$stopnumber = 57522; //display ($name,$stopnumber); function display ($head,$num) { $url = "http://countdown.tfl.gov.uk/stopBoard/$num"; $result= file_get_contents($url); $info = (json_decode($result,true)); $line = 0; echo("<section> <h5>$head<h5> <pre>"); foreach ($info['arrivals'] as $bus ) { ++$line; printf("%-2d %-4s %-16s%2d min\n",$line,$bus['routeName'],$bus['destination'],$bus['estimatedWait']); } echo("</pre> </section>"); } ?> More features? Just ask/join Richmond Makerlabs who working on it http://wiki.richmondmakerlabs.uk </body> </html>
Then do Kiosk mode edit your LXDE startup file to include the following:
@midori  -e Fullscreen -a http://localhost/kml-tfl-countdown-master/countdown.php
@unclutter
@xset s noblank
@xset s off
@xset -dpms
Or maybe:
@midori  -e Fullscreen -a http://localhost/kml-tfl-countdown-master/countdown.php
@unclutter
@xset s off -dpms
Lessons learnt
LXDE startup
The proper way (to avoid admin use! i.e. sudo) is to edit the .config file in the user folder This helps make it work in other distros and not affect other users
Cron Jobs
Cron jobs that can be edited with
$crontab -e
has a line command called
@startup SoSomething
Note this does work at system start up even before the window manager starts. It would seem too early for our needs. However, the cool thing is that you can do something like saying every friday afternoon (if the computer is on) check if my favourite TV series has been aired and do something (like send me an email!). Imagination is the limit.
profile.d
Another thing you can do is use profile.d First to get it started every time we turn on the computer/rasberry pi there is a directory /etc/profile.d one can put shell profile scripts in there and they will run after the user logs in. More info on profile.d: [6] Note that this runs after you log in (ideal in our situation) but before the window manager loads, causing applications and windows to load in the preferred order.
xautomatation
To do the full screen mode you will need a program called xautomation or something similar
$ sudo apt-get install xautomatation
This will be used to simulate pressing F11 to do full screen.
Create a file called bootup.sh with this in it:
#/!/bin/bash
epiphany-browser http://localhost/kml-tfl-countdown-master/countdown.php &
sleep 15
xte "key F11" -x:0
To explain the lines above, the first line runs the web browser. Second line waits 15 seconds Third line is the aforementioned command to press F11 (unsure about the -x:0) might be something about the display.
To be able to make is executable you will need to run.
$ chmod +x bootup.sh
We then copy that file to the profile.d folder
$ sudo cp bootup.sh /etc/profile.d/
The sudo command is necessary to write to the /etc/profile.d/ folder. It is typical that access to any folder other to your home directory needs administrator-level access unless permissions are setup. This is for a good reason so please be cautious with the sudo command.
Reboot the computer and you find this does not work.
Full screen mode epiphany
the xte command requires that your keyboard is plugged in. And the epiphany browser at the moment does not support command line arguments to make it full screen. Cool thing is that they would accept a patch.
[TODO] could not add accessibility socket?